Thursday, July 28, 2016

Project: Preview | LumoPad

Today I've got a quick- but fun- review for y'all: the LumoPad light drawing system by Nestor Tkachenko out of New York. You can find them at their Kickstarter:


Stick around and I'll give you the inside scoop.


---

Review - The LumoPad


What is LumoPad? It's simply a phosphorescent-paint board. You draw across the surface using a mini LED, which leaves streaks of light that fade after a short period of time. It's awesome. It's the perfect tool for children in a dark room, flipart-style animation,


The kit I recieved is just a prototype and and isn't as polished as the finished model will be. My version included:

-2x LumoPads

-1x superbright LED


It's simple, but effective and fun.

The Hardware:


The LumoPad is simple enough in design; It's a simple piece of foam board that's been painted on one side with phosphorescent (or Europium-based) paints. When exposed to the superbright LED, the chemical reaction leaves a trail of glowing light on the board. The finialized model will have the board enclosed inside a frame, for protection against wear and tear, but will still weight very little.

My LumoPads came in two different colors: Yellow and Blue. The yellow board was made with phosphorescent paints, which are brighter, but fade quicker. The blue is a Europium-derived paint that isn't as bright, but holds a glow longer.

The LumoPad is still in design progress and the creators have announced that they'll be continuing to upgrade and enhance the design over time. It's a fun product that's mess-free and great for children (or adults) to enjoy in a darker room, in bed, or just with a blanket over their head. 


And wraps things up! If you want to learn more, or find out when and where you pick one of these boards up for yourself, head on over to Kickstarter and tell 'em Carter sent you.
Until the next review...
..Carter..


Monday, July 11, 2016

Review | The TinyArcade

Today I've got a really amazing review for all you folks: the  arcade machine that fits in the palm of your hand, TinyArcade! It's made by the awesome folks at TinyCircuits up in Akron, OH. (Not too far from SHARD Labs, actually.) They were generous enough to ship a review unit down to me. So many thanks to them. You can find them at their website:


Intrigued? Keep on scrolling and I'll give the low-down on this Snickers-sized game box.

---

Review - The TinyArcade


What is TinyArcade? Put simply, it's a miniaturized arcade machine. You have a screen, joystick, and two buttons, all positioned in the standard setup inside a cabinet... the size of a fun-sized candy bar. Seriously. It's awesome. And you can get the cabinet in several different form factors: laser-cut acrylic, wood, or even 3D printed! The first two options can be ordered as either preassembled or build-it-yourself. The 3D printed, of course, comes in one piece.

The kit also comes with several bonus items as well. Besides the slip with the link to video instructions on using the TinyArcade, my model also came with:

-1x Decal stickers

-1x 8GB MicroSD card (and adapter)


Those decal stickers are nice. They allow you to pimp up your Arcade with a retro-style design on all sides. My sticker style was spaceship-themed, a nod back to the old Space Invaders game. 

The Hardware:


The TinyArcade is another stunning piece of technology by a company that specializes in scaled-down electronics. And yet the cabinet itself is suprisingly simple. There's a screen (duh!), power switch, joystick and two buttons, speaker and volume slider, and MicroSD slot. Oh, and the MicroUSB power port. Which is the only complaint of mine, and one I'll tackle right off the start.

The USB port is positioned inside the cabinet, beneath the screen. To access it, you have to thread a cable up through the bottom of the cabinet while still exerting enough force to plug it in. This is tricky enough. But for me, the ribbon cable that connected the main board to the speaker curled up and in front of the USB port, making inserting it impossible. I eventually used a Lego brick seperator to push down the ribbon and insert the cable. And not every unit may have this problem; it depends on the build. So that's just a personal complaint about my specific model.

Another note for users: The MicroSD slot is NOT CAPTIVE! It's simply static-holding. So if you push in your MicroSD card as hard as you can for five minutes, you aren't going to hear a click; just the snap of your card breaking.

The TinyArcade runs on a powerful 32-bit ARM processor, the same as in the Arduino Zero. This allows you to drive 30 FPS videos with audio, and play arcade-level games. The Lithium battery allows you to run the Arcade for roughly 3 hours of gameplay. And that speaker is real and magnet-driven, not just a piezo buzzer.

The display is a 96x64 OLED screen with 16-bit color depth. As I said before you can run any video at 30 FPS, which makes for a smooth (albeit cramped) viewing experience. And the backlight is software-controlled, meaning you can program adjustments for brightness control.

The last thing I'd like to mention is the audio. The TinyArcade comes with a magnet-driven speaker that can pump it out. Of course, the louder you get, the more crackly the audio will become, and you will drain the battery a bit faster. Also, not every game has audio. Just Tiny Shooter, Tinytris, and the Video Player, as of this writing.

The Software:


TinyArcade run on Arduino, a wonderful, versatile programming system that is simple to program yet quite powerful. The TinyArcade enlists a bootloader program that reads your MicroSD card and allows you to select a program installed on the card. It then loads the program to memory, and starts up the application. One note: if you remove the MicroSD card for any reason and turn on the TinyArcade, the only option you can select is the last program you loaded up.

TinyArcade comes with a handful of programs already installed on the MicroSD card. They are:

3D Demo: A Doom-style maze with nothing but a laser gun and TinyCiruit logos.

Driver Demo: A nod to the classic game Outrun.

Tiny Asteroids: An Asteroids clone.

Flappy Birdz: A flappy bird clone.

Tiny Invaders: A Space Invaders clone.

Tiny Run: An endless runner.

Tiny Shooter: A 2D space side-scrolling shooter.

Tinytris: A Tetris clone.

Video Player: Plays video files on the MicroSD card.

My favorite game, Tiny Run, is also the hardest. But they're all fun. None of the games have that much depth, but then again, this is an arduino-powered arcade machine, not a Playstation. The creators have said, however, that more games will be developed for the system in the future.

The only non-game application on the TinyArcade is the Video Player, which is a really neat program. It allows you to play videos that you have uploaded to the card on a tiny screen. So don't expect 4K graphics here, people. The TinyArcade comes with two videos preloaded: The original Kickstarter video, and Big Buck Bunny, an open-source short film made with Blender.

And you can always create your own content for your Arcade! That's the beauty of Arduino- through the USB port, you can easily reprogram the TinyCircuitry to do whatever you can come up with! (Within the TinyArcade parameters, of course.)

---

And wraps things up! If you want to learn more, or find out when and where you can buy one of these bad boys for yourself, head on over to the TinyArcade preorder page and tell 'em Carter sent you.

Until the next review...


..Carter..

Wednesday, June 15, 2016

Project: Preview | RoutaBoard

What's up, everyone? Today I'm reviewing the Routaboard, a new prototyping circuit board by KnivD out of London. Many thanks for the review units he shipped over. You can check him and his Kickstarter out here:


---


Project Preview: Routaboard


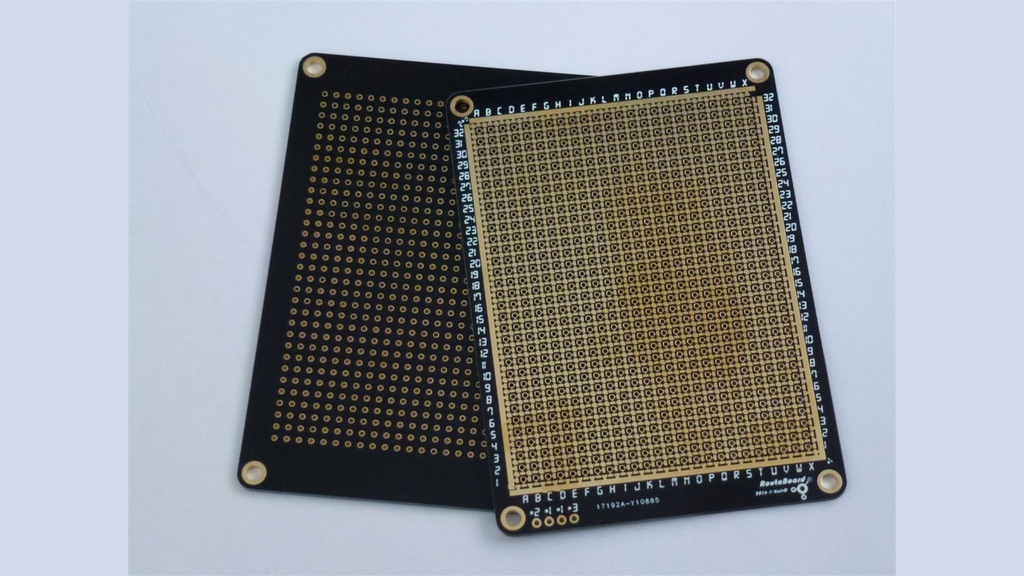
What is Routaboard? It's a really cool device- a blank circuit board with unconnected traces between each of the holes. This means that instead of having to connect your electronic projects together with wires, you can simply add a tiny drop of solder in between the holes you want, thus creating an actually professional-looking prototyping package.

Routaboard also comes with free software called RoutaEdit. It's a simple program that let's you design your projects digitally and figure out where to solder the traces ahead of time.
My review unit came speedily on through, which was nice since it came from overseas. I recieved four boards, (Two standard-sized doubled-sided boards, and two standard-sized singled sided boards.)

The boards look very sleek and professional, with a black finish contrasted by the gold holes and traces. They came without a single scratch or chip, which is very nice.

The Hardware:

The boards are a unique, and yet very smart idea and design. The standard size is 24x32 holes, big enough for most Arduino-type projects. (Or an Arduino shield!)


The traces are a bit confusing at first glance, but open up the RoutaEdit software and they'll make sense. The traces extend in all four directions from each hole, but are seperated from each other by gaps in the metal. The idea behind Routaboard is that you can apply a drop of solder in the gaps in the traces, which eliminates the need for wires in your package. And because there's no need to cut wires, you can use a desoldering tool to remove these solder drops and reuse the boards again and again.

Running along the side of each board is a strip of metal. These connect to the grid of holes and work as the power, ground, and a strip for inputs. (Such as Arduino analog or digital.)
Overall, the system is very handy. It makes prototyping much more minimal and space-conserving, although soldering the traces together may take a little more time. Keep in mind that to use this product to its maximum, you need a soldering iron and at least (some) solder on hand. Although if you're buying this board to begin with, you won't go far without said items.

The Software:

The Routaboard software, RoutaEdit, is... simplistic. I haven't used it for that long, but from what I can tell there... isn't much to do.


That's not to say it isn't helpful; RoutaEdit does give you a visual representation of how the traces work on the Routaboard, and you can use it as a guide while soldering to make sure you solder the correct traces.

The software also lets you add a virtual component to the board; however, the only components available right now are "blank" 1x2 components, DIP8, 14, and 16 parts, and resistors. Nothing else exists... yet.

The software is still in its early stages. As Routaboard continues its campaign and development, more features will be added, including a processing code written specifically for RoutaEdit projects. I can't wait to see what becomes of the program.

Oh, and a quick note: As of this post, RoutaEdit is only available for Windows. So OSX (sorry) macOS users, you may have to wait a bit.


Well, that about sums up the product. Did I convince you to invest in Routaboard? If I did, let me know in the comments below. Or send me your wallet out of gratitude. Either works. And ff you want to spend even more money, consider donating to the SHARD Labs GoFundMe!

-GoFundMe

Later, skaters!

..Carter..

Wednesday, May 11, 2016

Check out the DragonBox Pyra!

Hey guys. Today I've got another cool (and this time, open-source) product, the DragonBox Pyra! (pyra-handheld.com)


It's a portable Linux computer LOADED with special features, all in a clamshell package roughly the size of a DS.

Here's DragonBox's Press Release:.

---


The DragonBox Pyra – a combination of a miniature PC and a video gaming console. Developed together with a large community.
OpenSource, no spy-software included, no registriation necessary. Nothing.
Even the schematics will be made public.
A full-featured Desktop-Linux-PC that fits your pocket, open for everything and everyone. Designed and produced in Europe, avoiding slave labour.
Pre-orders have been coming in since they were made available the 1st of May.
Similar to crowdfunding in nature, but only a downpayment is needed –  and the remainder due when the unit is ready to be shipped.
The minimum order quantity of 500 devices has been funded already.
Next milestone is at 750, which means 1000 can be produced.
To get to this point has taken three years of development.
In February functional prototypes were made, which are thoroughly being tested to make everything ready for mass production and subsequent hands-on within the year.

As a successor to the Open Pandora, the Pyra carries numerous large and small improvements.


Besides updating the specifications to more modern standards, it follows a new concept that no other mobile device to date offers:

The Pyra is small and compact (only 13.9x8.7x3.2 cm), yet extremely modular. Designed to be modular it is user upgradable, both mainboard, displayboard and the one that has the processor and RAM are individual boards.
Designed to be easily repaired or modified - one screwdriver is all you need to take it apart.
Better for everyone and the environment.

Multiple real USB ports, Game-controls, backlit keyboard, replaceable battery, SD-card slots, Wi-Fi and Bluetooth, optional LTE mobile internet and telephony services with GPS and various sensors.

Use it as a desktop PC by connecting a HDMI-cable to a monitor.

The Pyra uses an ARM processor and comes equipped with a Debian GNU/Linux operating system. No accounts or registration is necessary to make this device fully functional, and no ads to be found accompanying the apps.

The Pyra has a large fan base and a community around it that goes far back.
A similar device is not currently available on the market.
---


Quite a mind boggler, eh? It's pretty sweet. 

You can preorder one of these bad boys at the same link at the top of the article, or go 
directly to their preorder page HERE.

Enjoy! We'll continue to cover this amazing product as it continues to be developed.

Until next time,

..Carter..


Wednesday, April 6, 2016

Project: Preview | WeKast Presentation Stick

Hey Folks! Another Project: Preview for you all! Today I'm previewing the WeKast presentation system by the WeKast team out of Tel Aviv. Many, many thanks to those folks for getting me a review unit. You can check them out at the links below:


---


Project Preview: WeKast Stick


So what is WeKast? To quote the Kickstarter, it's the only mobile-based professional presentation solution that completely eliminates the awkward set-up process while increasing mobility and engagement.

...To much for ya, huh? Well, it's essentially a wireless dongle that allows you to display your slideshow, powerpoint, demonstration, etc... directly from your smart device. No cables, laptops, or even WiFi necessary. It's pretty handy for those business meeting presentations where the WiFi just happened to go out- and guess who forgot their HDMI cord?

I got a review unit extremely fast; they informed me that they had shipped the unit on March 22nd, and I recieved the unit just three days later, on the 25th. So kudos to them in the shipping department.

My review unit camed enveloped in a soft velvet bag, secured with drawstrings. Each individual part of the kit had a plastic sleeve protecting it, and the WeKast Stick itself was secured in bubble wrap. So there was no chance of the good ol' USPS busting up this shipment.


I was surprised (in a good way) at how many accessories the review unit came with. Keep in mind, however, that many of these parts will be integrated into the final product and won't actually be included as seperate attachments. But anyway, here's what I got:

-1x WeKast Stick

-1x 6000 mAh Portable Battery

-1x Female/Female HDMI Connector

-1x Female HDMI/Female VGA Adapter

-1x Micro USB Cable

-WeKast and Battery Instruction Manual

A bunch of goodies included. Again, most of this will be integrated into the final product, so you won't need to attach all the external gadgetry. But this is a review unit, so the design and asthetics are NOT final.

The Hardware:


The WeKast is a smooth-looking little stick. Wrapped in matte black plastic, it is sparse of any decoration save the sticker on either side with the WeKast logo. (Actually, there's a enterprise option on the Kickstarter to order WeKasts with your own logo.) The HDMI plug is covered by a plastic cap made of the same material.

To set up my stick, I plugged the WeKast into my TV using the provided HDMI adapter. I then plugged the power pack into the stick via the back microUSB port. As soon as the power is plugged in, the stick automatically boots on.

To me, the WeKast is a pretty well-built product. The casing doesn't feel too flimsy (although I haven't, nor would I recommend, putting a lot of pressure on it.) The need for an external battery limits its potability slightly, but again, this just a TEST model. The stick is powered by a quad-core processor, meaning that your presentation will always be snappy and quick to load.

The Software:


The WeKast software is fairly simple and easy to use. It's built upon Android 4.4, and you'll actually notice this when the Android logo appears momentarily during setup.


In order to use the WeKast, you need three pieces of software to make things happen: First, you'll need a PowerPoint Presentation creation app. (Pretty obvious that you would have one if you're purchasing this device.) Secondly, you need the WeKast add-on button for PowerPoint. This installs into the PowerPoint app, and allows you to convert and send your slides and presentation files to your phone through your phone number. I found this method of file transfer a little odd, but just think of it as texting yourself the files. Finally, you'll need the WeKast app.

The WeKast app is SUPER simple. When you first enter the app, if you don't have any files, there's literally nothing to do or click, beside refreshing the page. (Although I do love the loading screen for the app, with its little flaming-logo animation.)

Once you have some files inside the app, you're ready to hook up to the WeKast stick itself. On Android and Windows Phone, this process automatically happens. On iOS, (I was) it may or may not automatically connect. If it doesn't, you have to go into the Internet Connections setting of your phone and connect to the "WeKast" network.

And now you're ready to rumble! You can load a presentation, set it to auto-scroll through the slides, and even add notes to each slide. It's pretty amazing.

Overall, the WeKast system is an incredibly helpful tool for any business who wants an easy, fluid way to present their information. As the Kickstarter continues and hopefully suceeds, it'll be interesting to see how the WeKast evolves and is formed into an even better product.


And that's the show! Be sure to check out the Kickstarter and donate to that. If you want to spend even more money, consider donating to the SHARD Labs GoFundMe!

-GoFundMe

Otherwise, have a great rest of your April!

..Carter..

Wednesday, March 23, 2016

Don't forget the forums!

Hey guys!

Just a heads-up that there are forums for the SHARD website!

Either use the following link or click the SHARD Forums tab on the top bar.

Thanks! Can't wait to see ya there!

..Carter..

A Change in Social Media Plans...

Hey everybody. I know it's been a little while since the site had any activity, but I just wanted to update everyone on SL's social media presence.

For the entirety of the site's existence, SL has had a large presence on Google+, and that has been mainly it. (Much to the chagrin of some.)

Up until February, we also enlisted Google Friend Connect, a service that allowed people with Twitter, AOL, and various other services to follow the site as well. However, Friend Connect... no longer exists. Well, it does, per say, but it only allows you to connect with Google+... which you can already do through the embedded Google+ tab on the blog.

So here's the role call for SHARD Labs: If you previously used Friend Connect to follow the site, PLEASE switch over and click "Follow" on the Google+ tab.


If you don't have a Google+ account or haven't bothered to follow us in the past... well, do it or suffer the consequences. Just kidding. Maybe.

Ta ta!

..Carter..